Accounting can generate a lot of paper. QuickBooks provides tools that can help you manage digital versions.
We’ve been talking about the “paperless office” ever since PCs hit our desks. Yet many workspaces are still cluttered with paper. Even in the digital age, many of us hold onto paper documents related to our QuickBooks records—receipts, contracts, price lists, bills, etc. Storing these papers in a way that allows for quick access can be difficult, often resulting in bulky and unmanageable paper folders.
QuickBooks offers an effective solution through its Doc Center, where you can store digital files in a central location. You can also upload and attach documents to specific records and transactions. Here’s how to make the most of these features.
Using the Doc Center
QuickBooks’ Doc Center streamlines the process of uploading documents into the software and managing them. It serves as a dedicated central storage space that allows you to:
●Upload files into QuickBooks from your PC itself or your storage devices,
● Enter keywords and descriptions and other details that can help you find documents,
● Open files, and,
●Remove files.
To get there, click Docs in the toolbar to open a window like the one pictured below.
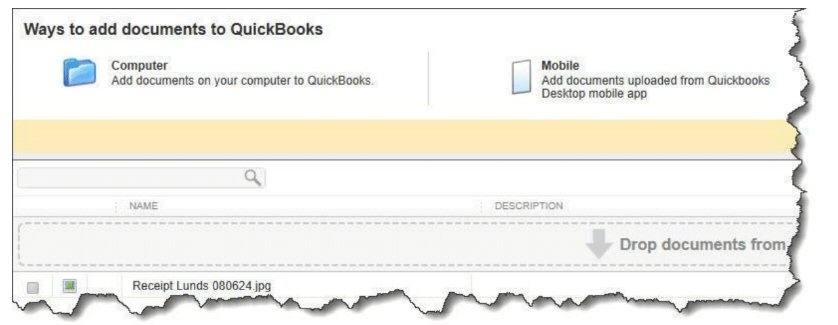
QuickBooks’ Doc Center, showing a file that’s been uploaded.
Click Add document in the upper left corner. QuickBooks will open your PC’s file directory. Scroll to the correct folder, then double-click the desired file to move it into the Doc Center. It will appear in a list there, along with the date and time it was uploaded. You can also drag and drop documents from your desktop or from Microsoft Outlook.
Once a file appears in the Doc Center’s list, you can open or remove it by highlighting it and clicking the button in the lower right corner. ClickView Details, and QuickBooks opens a window where you can enter a Title, Description, Keywords, and Comments.
Uploading Receipts
If you’re trying to upload receipts into the Doc Center that are in a graphics format like .jpg or .png, you may get an error message and be unable to open them. Word and PDF documents should upload just fine, but Windows may not be set up to display your graphics files in QuickBooks. If this happens to you, minimize QuickBooks and enter the phrase “default apps” in the search box in the lower left corner of Windows (the far left box on the toolbar). Click it to open the Settings window.
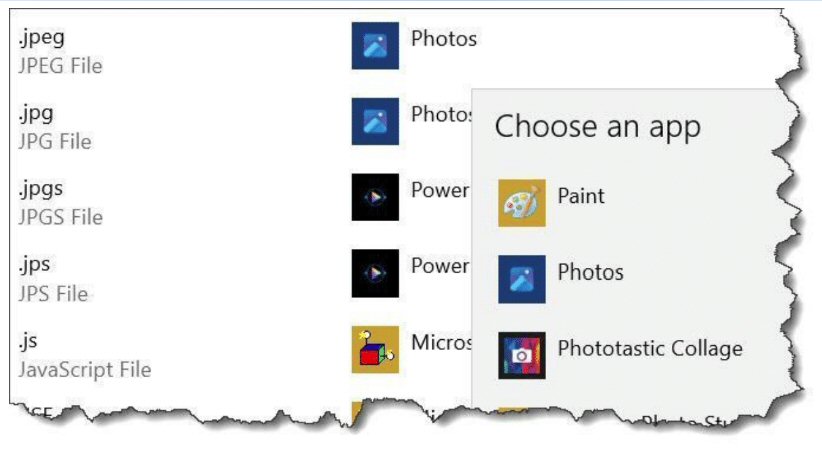
You’ll need to work with Windows’ default apps settings if you find you can’t open uploaded receipts in a graphics file format like.jpg.
Scroll down and click Choose default apps by file type. Scroll down in the lengthy list that opens until you see your file type (like JPEG File) in the left column. Click the Photos icon to the right, then Photos again in the window that opens, like in the above image. It will look like nothing has happened. Close the window and go back to QuickBooks. You should be able to upload receipts withthe file extension now. Repeat this process for any file type you use to save documents.
Attaching Files to Transactions
The Doc Center is a good place to store files quickly that you don’t want attached to anything. But say you’re entering a bill and you want to attach an invoice you’ve scanned. You’d go to Vendors |Enter Bills and fill in the bill’s details, then click Attach File in the toolbar. In the window that opens, you’d click Computer in the upper left corner if you wanted to select a file from your PC’s directory or Doc Center if you wanted to pull one that you’ve saved there. Find your file and double click it, then click Done.
You’ll notice that the Attach File icon in the toolbar has changed a bit to include the number of attachments you’ve uploaded. Click it to open the Attachments window, then double click the name of the file you just attached to the bill. Close the file after you’ve looked at it, then click Done. Finish the bill and save it. Attachments you’ve uploaded will always be available when you open their corresponding transactions.